|
|
 发表于 2020-12-2 09:41:46
13744 浏览 1 回复
发表于 2020-12-2 09:41:46
13744 浏览 1 回复
[入门教程]
Ardupilot中的串口调试以及example学习
本帖最后由 chasing 于 2020-12-2 09:42 编辑
Ardupilot代码提供了丰富的学习历程,方便新手入门。官方网站已经给出了具体的实验步骤,我这里只是重复做了一下。
首先,可以通过 `./waf list|grep 'examples'` 查看对应的examples都有哪些。然后将对应的example 编译到板子之中即可。执行指令如下:
- ./waf configure --board=Pixhawk1
- ./waf build --target examples/UART_test --upload
也可以通过sitl的方式来查看,具体如下:
- ./waf configure --board=sitl
- ./waf build --target examples/UART_test
如果是sitl则可以直接执行查看结果,操作如下:
- ./build/sitl/example/UART_test -M heli -C
注:
1. ardupilot中的串口设备是和bootloader中的serial顺序相关的,按照bootloader中顺序给定串口serial 1,2,3(程序中给的是uart A,B ,C ,D)
2. 在每个机型的文件里面都有一个wscript文件,里面包含有编译时候需要编译的文件内容。例如 `/ardupilot/Arudcopter/wscript`
下面给出一个示例程序:
- #include <AP_HAL/AP_HAL.h>
- void setup();
- void loop();
- const AP_HAL::HAL& hal= AP_HAL::get_HAL();
- static void uart_setup(AP_HAL::UARTDriver *uart, const char *name)
- {
- if(uart ==nullptr)
- {
- return;
- }
- uart->begin(57600);
- }
- void setup()
- {
- hal.scheduler->delay(1000);
- uart_setup(hal.uartA,"helloA");
- uart_setup(hal.uartB,"helloB");
- uart_setup(hal.uartC,"helloC");
- }
- static void uart_test(AP_HAL::UARTDriver *uart, const char* name)
- {
- if(uart == nullptr)
- {
- return;
- }
- uart->printf("%s at the time %.3f\n", name, AP_HAL::millis()*0.001f);
- }
- void loop()
- {
- hal.scheduler->delay(300);
- uart_test(hal.uartA,"helloA");
- uart_test(hal.uartB,"helloB");
- uart_test(hal.uartC,"helloC");
- }
- AP_HAL_MAIN();
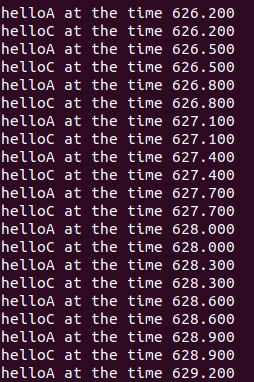
程序运行结果如下图所示:
|

扫一扫浏览分享
|
|
|
|
|
|
|
|
|

|